Why Server-Side Compositing Exists
VibeChopper is browser-first where that makes the editing experience fast. Users can upload footage, inspect frames, browse transcripts, and describe timeline changes without treating the browser as a dumb remote control. But a final export has a different job than a preview. It must produce a stable video file, apply timeline semantics consistently, land in durable object storage, and leave enough metadata for the editor, AI edit run, media panel, and repair systems to agree on what happened. Render a timeline free
That is the reason for the server-side FFmpeg compositor in server/videoCompositor.ts. The compositor accepts a user ID, project ID, export ID, target format, resolution, FPS, and progress callback. It loads the project-owned timeline state, downloads the source material into a temporary render workspace, builds a filter graph, encodes through FFmpeg, streams the output to object storage, and returns the storage path, file size, and duration. The public product action is simple: render a timeline. The backend contract is deliberately specific.
The hard part is not only FFmpeg syntax. The hard part is making FFmpeg behave like a production subsystem inside an autoscaled app. Renders can be large. Source files can be large. Generated audio and overlays can arrive from different product paths. Users can trigger multiple exports. Temporary files can fill disk. A happy-path demo can ignore all of that. A product cannot.
VibeChopper handles that by putting controls around the compositor. Render concurrency is bounded in process. Each export receives its own scratch directory. Scratch usage is checked after source downloads, overlay downloads, and encoding. Output is streamed from disk to object storage instead of being read into one giant buffer. The scratch directory is removed in a finally block whether the render succeeds or fails. These choices are not glamorous, but they are what keep cloud rendering from turning into filesystem clutter.
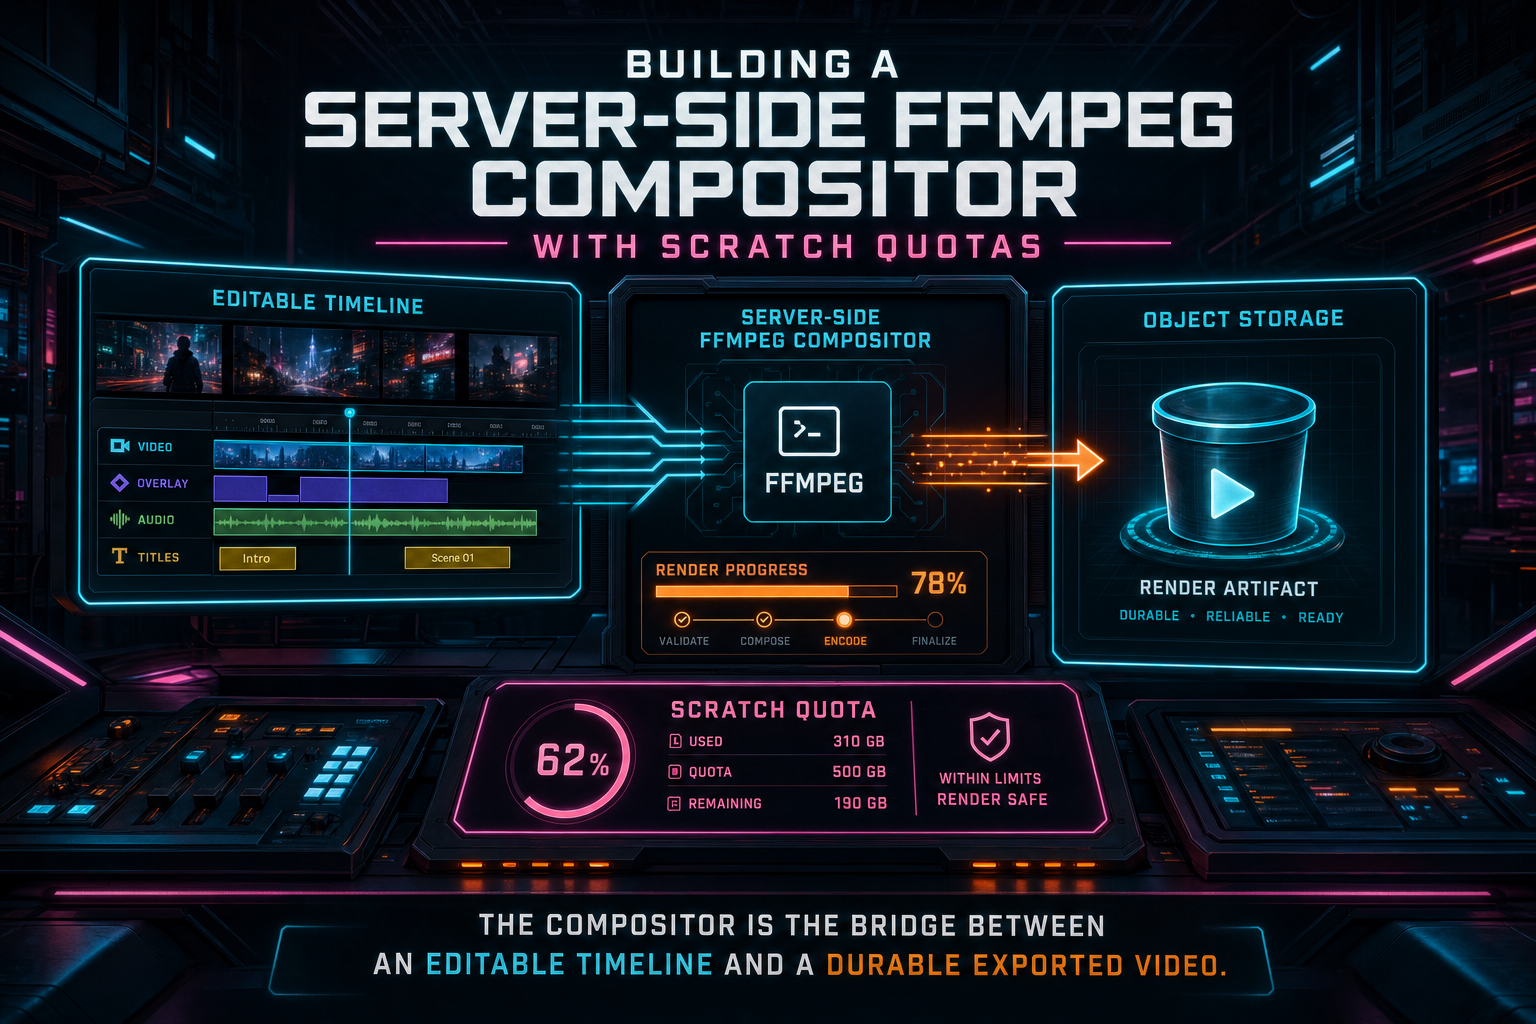
The compositor is the bridge between an editable timeline and a durable exported video.
The Render Lifecycle
The first operation in the compositor is not FFmpeg. It is admission control. RENDER_CONCURRENCY defines how many renders can run at once in the current process, with a conservative default of one. acquireRenderSlot increments an in-flight counter or queues the job until a slot is released. The release function runs in renderProject's finally path, so a failed render does not permanently consume capacity.
That limiter is intentionally small. FFmpeg is CPU-heavy, memory-hungry, and very good at exposing weak assumptions about shared infrastructure. A web app can serve many lightweight requests at once, but export work should be treated more like a job. In-process concurrency is not a global distributed scheduler, and it does not pretend to be one. It is still an important local safety rail for a Replit-style runtime or any Node process that can receive a burst of render requests.
Once admitted, the compositor creates a scratch directory using RENDER_SCRATCH_DIR or the operating system temp directory. The directory name includes the export ID, which makes logs and local inspection easier while keeping each render isolated. The project state is then loaded in parallel: clips, videos, transitions, overlays, tracks, and motion keyframes. Clip effects are loaded per clip with defensive fallback to an empty effect list if one lookup fails.
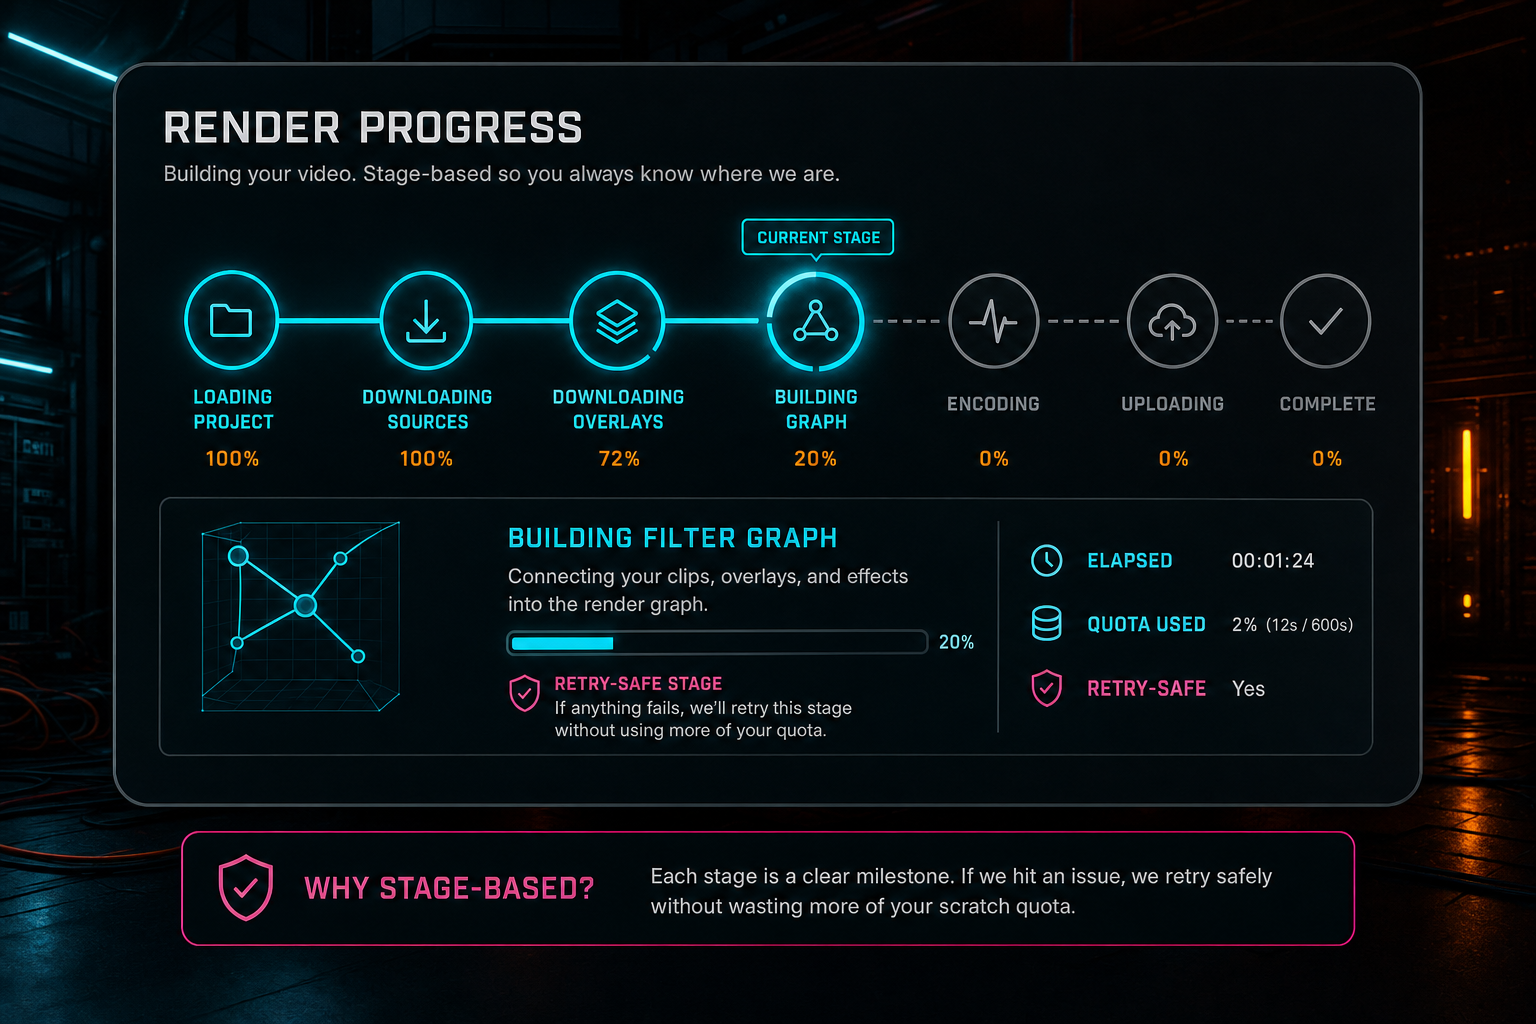
From there, the lifecycle moves through named stages: loading_project, downloading_sources, downloading_overlays, building_graph, encoding, uploading, and complete. Those stage names matter because long-running media work needs visible progress. A percent without a stage can still feel frozen. A stage gives the product a way to tell the user whether the render is gathering media, building the graph, encoding frames, or moving the finished file into storage.
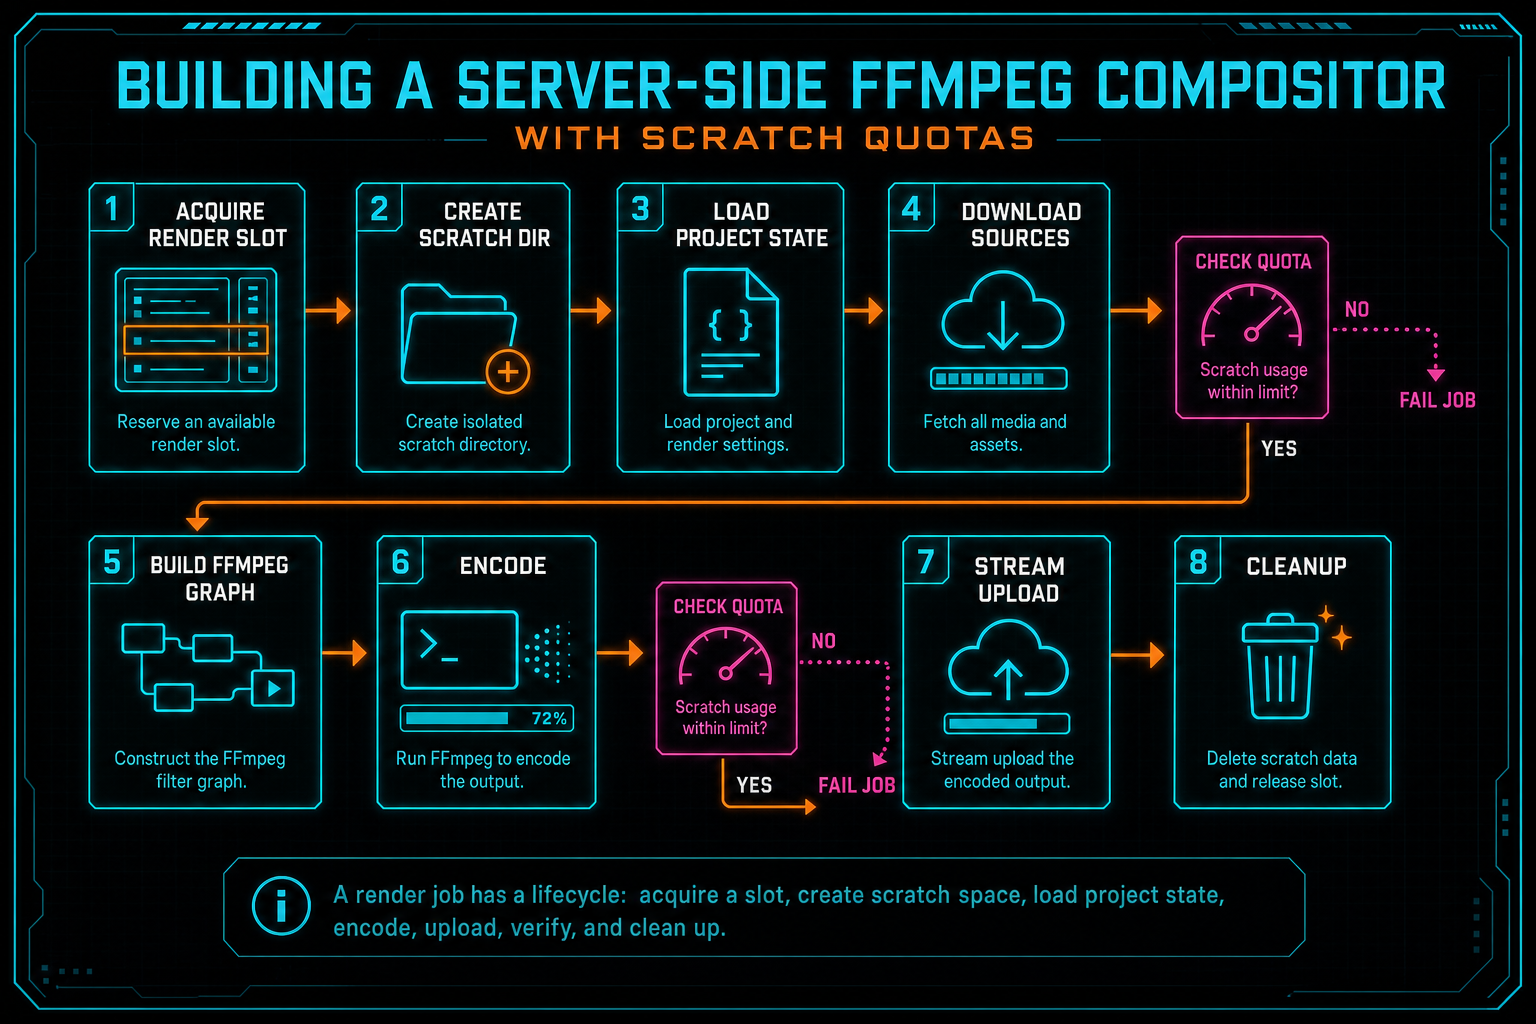
A render job has a lifecycle: acquire a slot, create scratch space, load project state, encode, upload, verify, and clean up.
Scratch Quotas Are a Product Boundary
The scratch directory is a working area, not a storage product. That distinction is easy to lose when the first render works. Source files are downloaded there. Overlay images are downloaded there. FFmpeg writes its output there. If the system never measures that directory, a few large jobs can quietly turn temporary space into the failure mode for the whole app. Explore your media graph
VibeChopper's compositor has a simple quota model. RENDER_SCRATCH_MAX_BYTES controls the maximum allowed scratch usage, and the default is 20 GB. getDirectorySizeBytes walks the render directory recursively and counts file sizes. assertRenderScratchWithinQuota compares current usage against the configured ceiling and throws when the render workspace exceeds it. The check runs after source downloads, after overlay downloads, and after encoding.
Those checkpoints are placed where growth happens. Source downloads can dominate scratch size before FFmpeg even starts. Overlay downloads are usually smaller, but they still count, especially when generated assets become part of richer timelines. Encoding can produce a large output file. Checking only at the end would detect the problem after the expensive work already ran. Checking at each boundary gives the pipeline earlier, clearer failure points.
A quota error is not a moral judgment on the user's project. It is an operational boundary. The product can tell the user to try a shorter timeline, lower resolution, or fewer simultaneous renders. The server can preserve its own ability to keep working. The media panel can still show durable assets because final outputs belong in object storage, not in the scratch directory. That is the healthy relationship between temporary storage and product storage.

Scratch storage is treated as a bounded working area, not an unlimited staging bucket.
Sources Stay Project-Owned
The compositor does not accept arbitrary URLs and ask FFmpeg to fetch them. It loads videos and generated audio through server storage and object storage services using the authenticated user and project IDs. For each source-backed clip, it finds the matching project video record, normalizes the object path, downloads the media to scratch, probes metadata when possible, and records whether the source has audio, video, or both.
That source model matters for two reasons. First, authorization stays on the server. The render path sees the same user-scoped project data model as the rest of the app. Second, media type behavior becomes explicit. A normal video clip can contribute video and audio. A generated music or voiceover asset may be audio-only. An image clip should not try to produce audio. These distinctions become inputs to the graph builder instead of guesses buried in FFmpeg stderr.
Overlay downloads use an additional safety rule. downloadOverlay only accepts object-storage references such as /objects/..., objects/..., Replit object-store paths, gs:// references, or URLs that include /objects/. Non-object-storage overlay URLs are refused. That protects the renderer from becoming a server-side request tool against arbitrary addresses. In a creative product, users should be able to generate and place visual assets, but the render process should still know where those assets are allowed to come from.
After all sources and overlays are downloaded, the compositor checks the scratch quota again. That is the moment when the render has gathered the raw ingredients but has not yet spent CPU building the final video. If the workspace is already too large, stopping there is the correct behavior.
Timeline Semantics Become a Filter Graph
The core compositor job is translating VibeChopper timeline semantics into FFmpeg filters. A clip is not just an input file. It has source start and end points, timeline start and end points, speed, reverse state, fades, audio volume, mute state, track assignment, optional speed ramp behavior, optional clip effects, and sometimes motion keyframes. The compositor turns that data into trim, setpts, scale, pad, fade, reverse, color, audio, and timing filters. Try the effects pass
Clip effects are bounded before they reach the graph. Color correction clamps exposure, brightness, contrast, saturation, temperature, tint, highlights, and shadows into controlled ranges. LUT-style effects map to adjustment filters. Blur, sharpen, vignette, and film grain become explicit FFmpeg filters. The tests in tests/videoCompositorEffects.test.ts cover those mappings and confirm that disabled effects do not leak into the graph.
Speed deserves special care. Constant speed changes use video setpts and audio tempo or sample-rate retiming. Speed ramps are converted into source and target segments, then concatenated back into one clip stream. Audio can follow the ramp, preserve pitch through atempo, retime through sample-rate filters, or be muted for the ramp when the timeline asks for that. This is the kind of behavior that makes a server compositor feel like an editor instead of a file converter.
The graph then composes clips onto a canvas. When the timeline is simple, the compositor can use a concat path. When the timeline includes overlays, transitions, keyframes, gaps, or layered tracks, it creates a black base canvas and overlays positioned clip streams into their timeline ranges. Motion keyframes can drive x, y, scale, rotation, and opacity expressions. Transitions such as fade, dissolve, slide, wipe, and push become alpha or animated overlay behavior. Adjustment tracks apply LUT and color filters globally or across adjustment clip ranges.
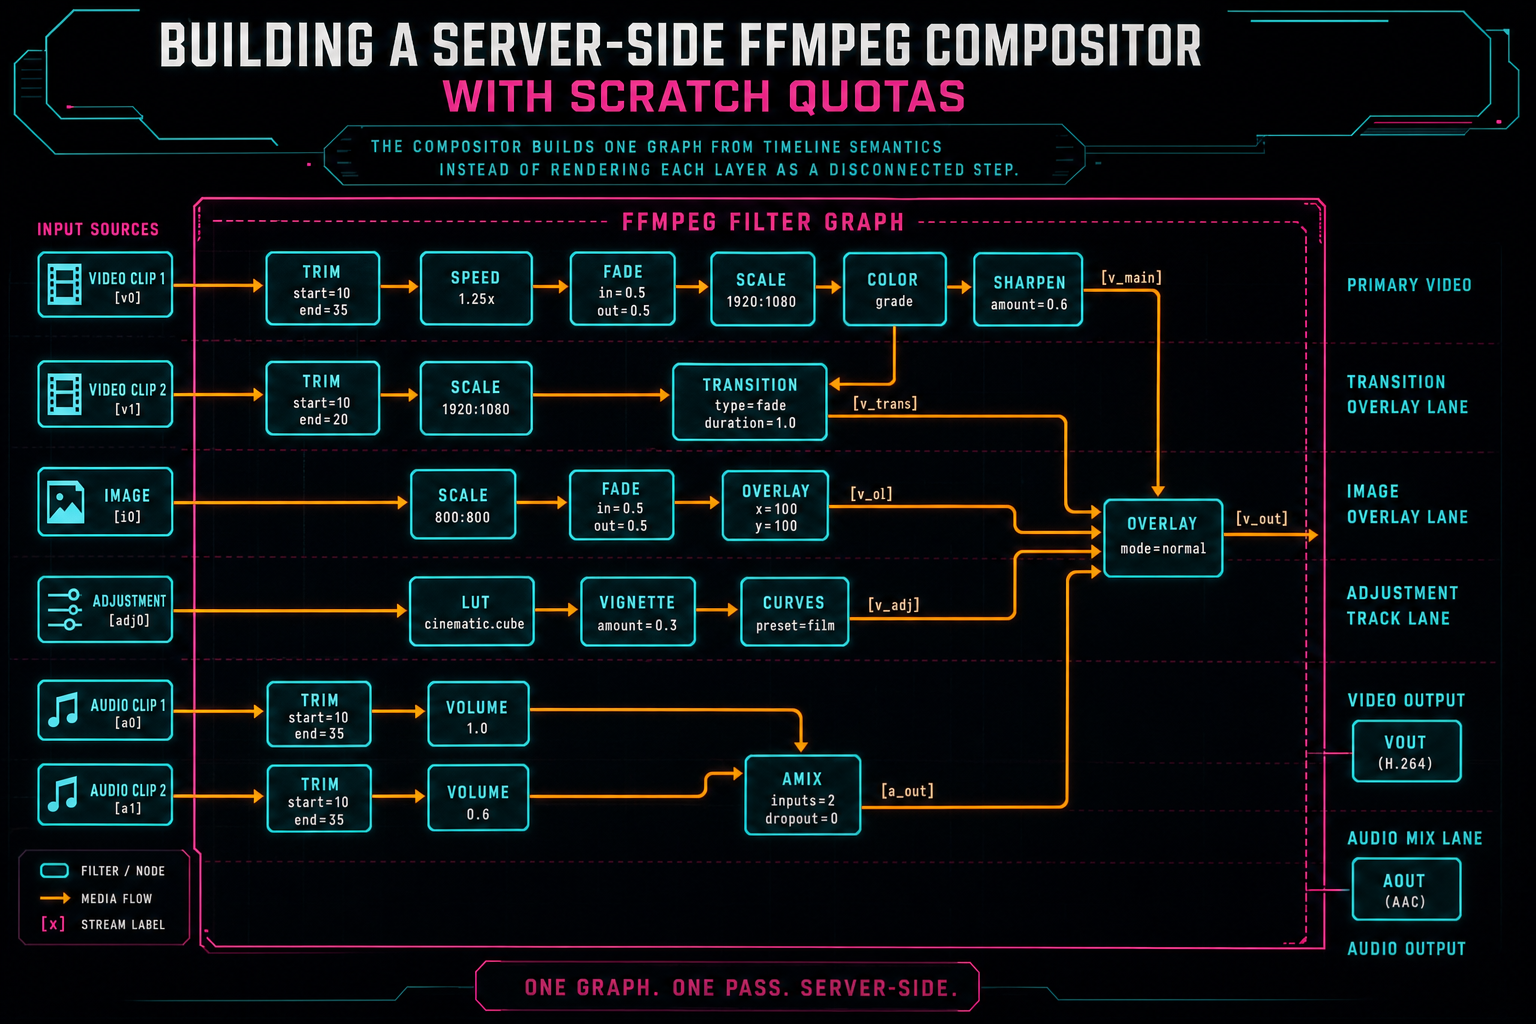
The compositor builds one graph from timeline semantics instead of rendering each layer as a disconnected step.
Audio Is a Real Track
A video compositor that treats audio as an afterthought creates user-visible drift. VibeChopper's render graph builds audio alongside video. Clip-local audio is trimmed to the same source range, retimed when speed changes, faded in or out, volume-adjusted, and delayed to its timeline start. Track volume applies after the clip delay. Audible streams are mixed with amix, padded, trimmed to the total timeline duration, and reset to a clean timestamp base.
Track state also matters. Muted tracks are silent. Soloed tracks mute non-soloed tracks. Audio-only tracks do not render video. When the timeline includes explicit audio clips, normal video clips are gated so the explicit audio arrangement can define the mix. That behavior keeps generated music, voiceovers, and dialogue edits from fighting each other during export.
There is an environment escape hatch, RENDER_DISABLE_AUDIO=1, that sends existing clip audio labels to anullsink and skips the mix. That is useful operationally, but the main product path treats audio as first-class timeline data. Creators do not think in separate media pipelines when they hit export. They expect the rendered result to respect the edit they built.
The Output Handoff
After the filter graph is assembled, the compositor writes one local output file inside the scratch directory. MP4 and MOV use H.264 with libx264, AAC audio when audio exists, yuv420p, a veryfast preset, and +faststart for MP4. WebM uses VP9 and Opus. Progress is read from FFmpeg's -progress pipe:1 output, converting out_time_ms into an encoding percentage that occupies the middle of the render progress range. Render a timeline free
When FFmpeg exits successfully, the compositor verifies that the output path exists and stats the file. That file is then streamed directly from disk into object storage with a stable render object path: /objects/projects/{projectId}/renders/{exportId}/output.{ext}. The MIME type is chosen from the output format, and upload progress fills the final stretch of the progress bar.
Streaming is important. The server should not read the entire rendered video into memory just to upload it. Disk is already the staging medium for FFmpeg output, so the upload path uses the file at that path and reports bytes as they move. The returned render result contains the durable storage path, file size, and duration. That result can feed export records, render verification, AI edit run artifacts, and media graph displays.
This is also where scratch discipline pays off. The output file lives locally only long enough to be uploaded. The durable product artifact lives in object storage. The editor should link to that stable artifact, not to a temporary path that may vanish after cleanup or process restart.
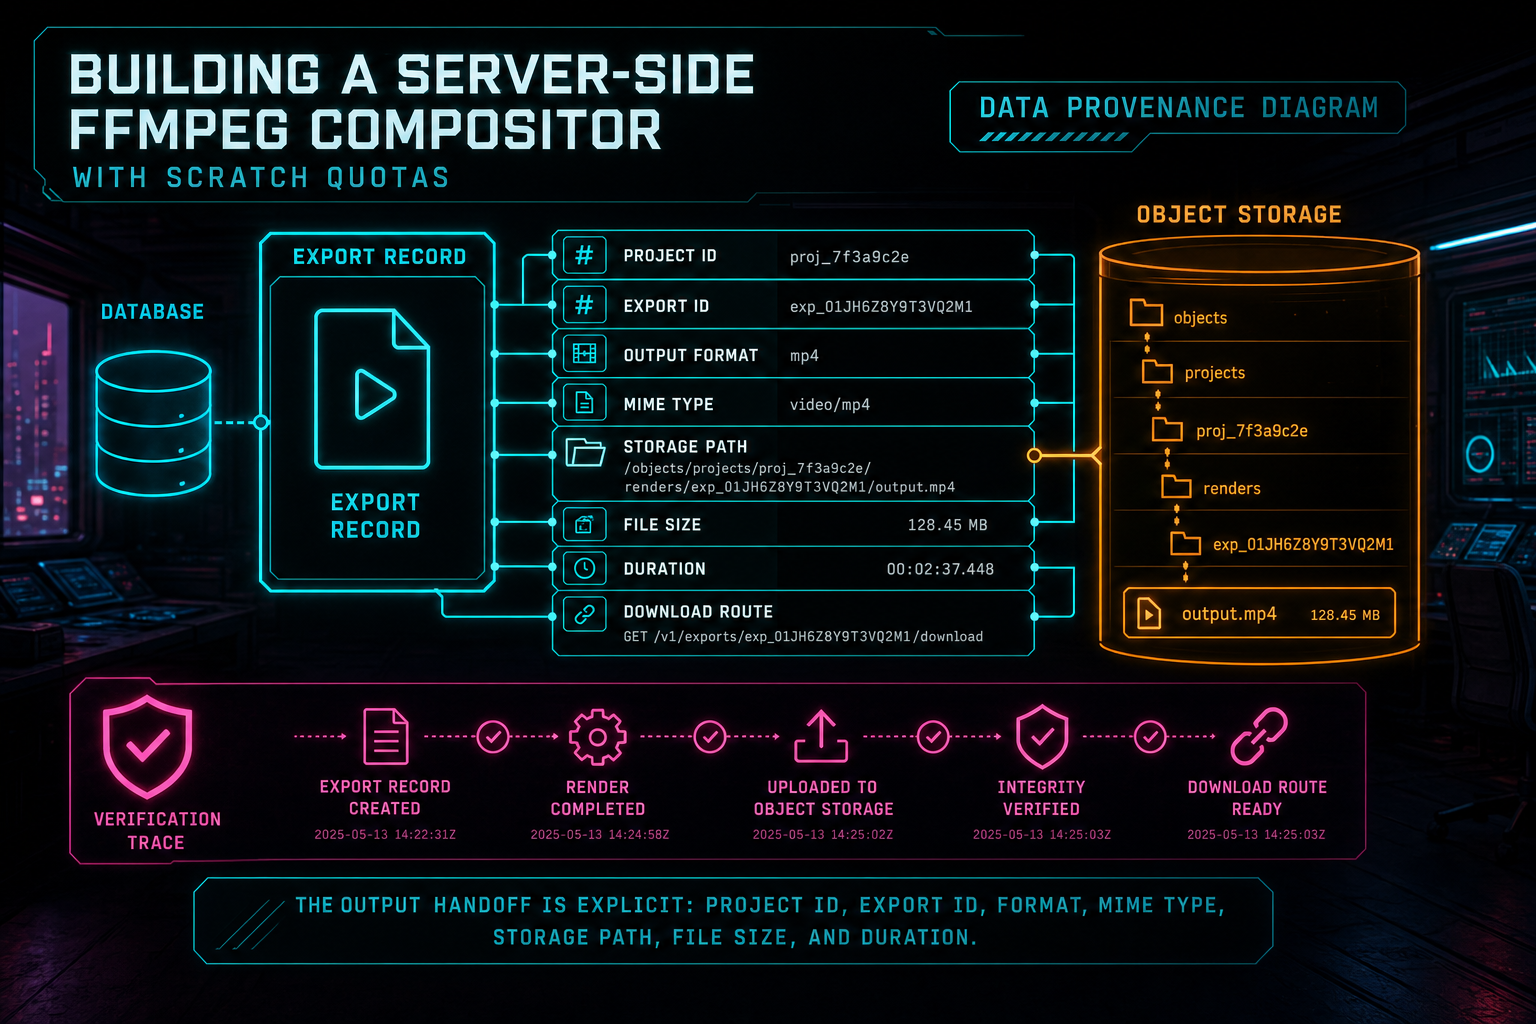
The output handoff is explicit: project ID, export ID, format, MIME type, storage path, file size, and duration.
Progress and Failure Are Part of the API
Long-running render work needs more than a promise that eventually resolves. The progress callback gives the rest of VibeChopper a stage and percentage that can be written to an export record, shown in the UI, or attached to an AI edit run. Early stages reserve room for setup. Encoding reports frame-time progress. Uploading reports byte progress. Completion is explicit. Open the edit-run receipts
Failure gets the same respect. Missing clips, missing source media, absent renderable clips, FFmpeg exits, quota failures, and upload failures all stop the render instead of producing a fake success. The compositor keeps the tail of FFmpeg stderr, which is enough to diagnose many graph or codec failures without letting logs grow without bound. Higher-level render verification can then turn missing storage path, zero file size, missing duration, or sanitized quota errors into user-facing blockers.
The finally cleanup path matters here. A failed FFmpeg command still removes the scratch directory. A failed upload still removes the scratch directory. A quota exception still removes the scratch directory. The release function for the render slot also runs after failure. That is the difference between an error that affects one export and an error that poisons the next render.
In an AI-assisted editor, this clarity is even more important. An AI edit run may trigger a render after planning and tool execution. If export fails, the run should show where it failed, not leave the user guessing whether the model, the timeline, FFmpeg, object storage, or scratch disk was responsible. Stage-based progress and structured render results give that workflow a backbone.
Progress is stage-based so the user sees where the render is, not just a spinner.
What Developers Should Copy
If you are building a cloud video renderer, copy the boundaries before you copy the filter strings. Put admission control in front of FFmpeg. Give every export an isolated scratch directory. Make scratch storage configurable. Measure it after every stage that can grow it. Delete it in a finally block. Stream the finished file to durable storage. Return a small, concrete result instead of asking callers to parse logs.
Also keep source authorization close to the render path. Do not let the compositor fetch arbitrary user-provided URLs. Resolve source media through your own project records and storage service. Treat generated audio, overlays, voiceovers, source clips, image clips, adjustment tracks, and effects as timeline data with explicit behavior. The renderer should be expressive, but it should not be vague.
Finally, test the graph builders where they can be tested cheaply. VibeChopper exposes compositor test hooks for render object paths, clip effect filters, adjustment filters, clip filters, equivalent-clip collapsing, and render-equivalence keys. Those tests do not replace full render tests, but they catch a lot of contract drift before a user waits through an export.
The Result
The server-side compositor lets VibeChopper keep the editor fast while still producing product-grade exports. The browser can remain the creative surface. The server can own the final render boundary. FFmpeg can do the heavy media work, but it runs inside a shape that understands users, projects, storage, progress, quotas, cleanup, and provenance.
That shape is the real lesson. A compositor is not just a command string. It is admission control, source loading, graph construction, scratch accounting, progress reporting, output upload, cleanup, and a typed handoff to verification and media systems. When those pieces are present, cloud rendering stops feeling like a risky side quest and starts behaving like part of the editor.
For VibeChopper, the user-facing promise stays direct: describe the edit, apply the effects, render the timeline, and keep moving. Under the surface, the platform is making sure the temporary work stays temporary and the final video becomes a durable artifact with a trail.
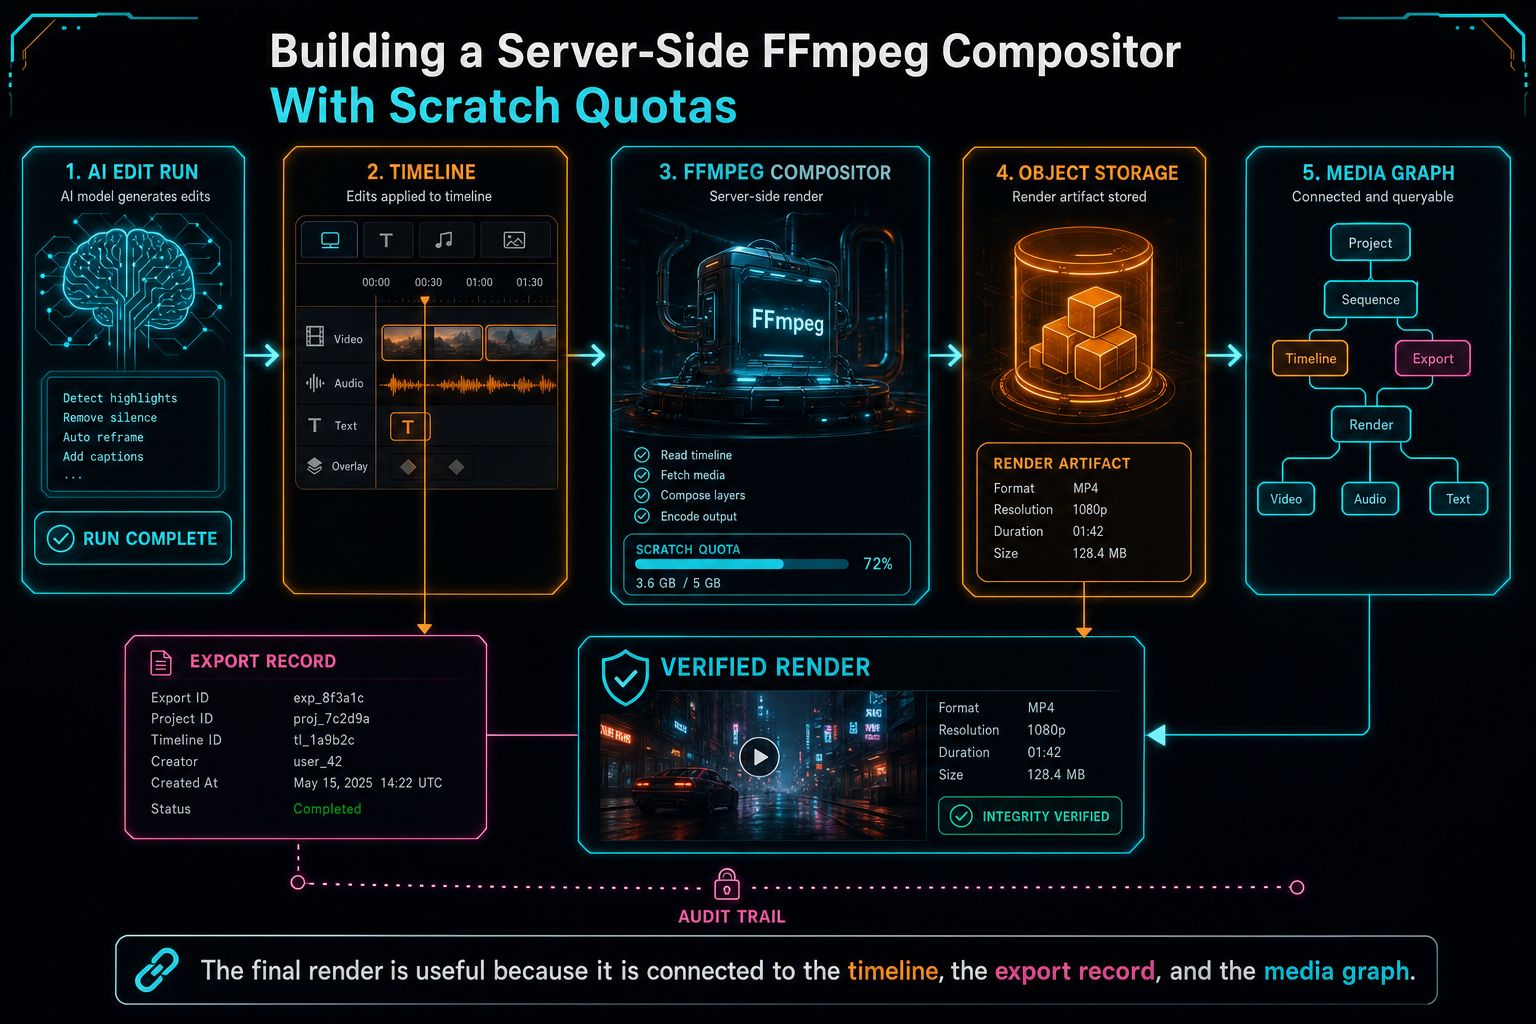
The final render is useful because it is connected to the timeline, the export record, and the media graph.
Try the workflow
Open every feature from this post in the editor
These panels collect the features discussed above. Sign in once, finish your profile if needed, then the editor opens the first highlighted surface and walks through the tutorial.
Step 1
Render a verified timeline
Export a project through the same storage-backed render path described in this article.
Render a timeline free →Step 2
Open the media asset graph
See generated audio, rendered assets, source clips, metadata, and provenance in the media panel.
Explore your media graph →Step 3
Apply timeline effects
Try clip effects, speed ramps, color passes, and export-ready compositor behavior.
Try the effects pass →Step 4
Inspect an AI edit run
Open the editor and see how plans, tool calls, artifacts, and render results stay connected.
Open the edit-run receipts →